


Have you ever made the perfect fruit and muesli parfait breakfast and thought, “this is so instagrammable” only to be disappointed by the photo you took of it? (Ok let’s be real: my breakfast is rarely glamorous, usually my 4-year old’s leftover bowl of Captain Crunch or half eaten Eggo waffle). Or have you been at a restaurant and served the perfect platter of crudités, and you ask your hungry companions to wait while you try to grab the perfect shot, only to get one that’s dark and mediocre? A beautiful instagrammable scene suddenly falls flat on the screen of your phone. Thanks phone! You post it anyway but then wonder, how do those igers do it?!
Yes, these are the days that we live in.
I want to help you take better photos with your fancy camera and with your iPhone. Let’s face it, the iPhone, is likely the thing that you have on hand during times like these, (unless you carry an enormous purse and fancy cam around like I do). Below I will share a few tips for taking better photos for your social media with either device.
1. Take your photos in the daytime, outside in the open shade.
Natural light is the very best light source for taking a nice bright airy photo and keeping your whites balanced and the colours true to what they are. if you can get outside, and it’s a sunny day, find an area with open shade (lots of shade) to avoid shadows. (Unless you like shadows, then skip the shade!)
2. Ask for a seat next to the window. Wait for one if you have to!
Choosing a seat next to a big bright window will ensure that you have plenty of light to work with to bring light into your image. Make sure there isn’t anything, or anyone obstructing the light coming from the window to your photo subject. Avoid direct sunlight if you’d like to avoid shadows.
3. Use a DIY reflector.
A reflector is simply an item that will reflect light back onto your subject, brightening or eliminating shadows. Take a look around you and find something white, it could be a cloth or paper napkin, a sheet of paper, maybe even a menu or an empty white plate.
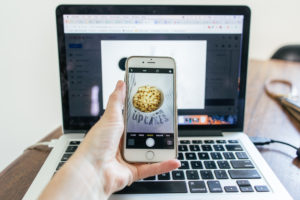
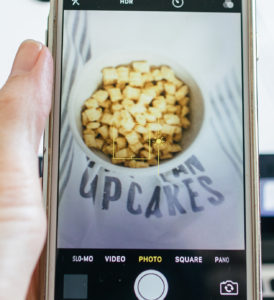
4. If you’re using your iPhone, Turn up the brightness inside your phones camera app.
To do this simply tap the screen on the subject you would like to bring focus to, and swipe your finger up on the sunshine line to increase your exposure (or down to decrease exposure). Tip: don’t use the camera’s zoom to get closer to your subject, instead, move your phone closer to it, or crop the image later. Also, hold your hands as still as humanly possible. Stabilize yourself on another surface or your elbows, if possible.
5. Widen your aperture inside the manual settings of your fancy cam.
You’ll want to let in loads of light and give your subject all the attention! Widening the aperture will make your photo subject tack sharp while blurring background items. Wait, what? Learn more about this by taking my quick online course!
6. Be brave, stand on your chair.
For a great aerial angle, getting well above your subject is ideal. Shooting with your subject at floor level or hopping up on a chair, step stool or ladder will help. You might need to ask your dinner companion, (or instagram husband) to hold your reflector while you stand and snap. It’s a group effort really.
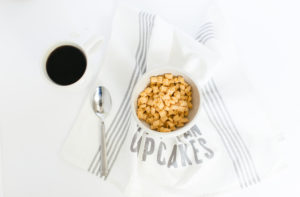
Here’s how I grabbed today’s photo. The setup and photo took about 3 minutes, approximately the same amount of time that it took to consume the Captain Crunch and coffee 😉

First I placed the white cardboard beneath, and then I placed two opposite the window to reflect light back onto the subject. One reflector would work well too!
And there you have it! I would love to see your pretty pictures, please tag me when you use these tips with #kellyworkshop
Also, if you’d like to learn to use your fancy camera, you should check out my online course. I’ll have you snapping piles of instagrammables in no time!